Showing posts with label collage. Show all posts

Friday, April 5, 2013

School-wide art show

I know I haven't blogged in a while, my friend Ted (www.artwithmre.blogspot) has been bugging and bugging me about it, but I have been very busy and a little forgetful! Anyways, now that some big things have been taken off of my plate, now I have time to post some pictures. One of the major things that I was dealing with was a school-wide art show. There are two art teachers here at my school, but with almost 900 students, this is still a lot of work. Most of my classes displayed their prints, but the kindergarteners displayed their bugs, and the third graders had photo collages up.


Wednesday, September 19, 2012

Crazy beginning of the school year!

It has been quite a school year already, I almost want to start over. My school is almost 100 students over projected numbers, so we have been adding classes and moving students like mad, which means that my schedule has changed as well. Due to personal reasons, I have had to miss about a week and a half of school, and now it is close to the end of the 9 weeks and I am scrambling to get the 3rd and 4th graders projects finished for their upcoming art show. Phew!
On a good note though, the second graders are finishing up their collage projects, and they are turning out well. First the students tissue paper collaged a 9x12 piece of paper for the background. Then they traced their hands on a thicker piece of paper. We took about 20 minutes to brainstorm words that describe personal qualities, which the students then write all over their hands with sharpies. The students then cut their hands out and attached spacers (some plastic beads that were donated to the art room) on the back of their hand, and then glued them to their background. Many of the teachers have been impresses with the range of descriptive words the students have come up with.

Wednesday, March 7, 2012

Texture Hamburgers

While browsing on Pinterest, I came across a fantastic idea found here http://kidsartists.blogspot.com/2009/10/texture-balance-and-variety-were.html
I thought this project was great, and filed it away until I found the right time and grade level to do it with. Finally, it was the right time. This 9 weeks, the kindergarteners have been working on textures. We have talked about both tactile and visual textures, and worked with crayon rubbings, and clay that we pressed textures into. I finally decided to pull this project out, although I did change it slightly. The project above revolved around both the favorite foods of the students as well as the texture, but I wanted my students to focus on just the texture aspect of the project. So I went through all of my cupboards and pulled out all sorts of goodies.
I had some dries split peas, cheerios, fuzzy yarn, some plastic "beads" (not really beads, but not sure what they really are, they were donated), rope, crepe paper, paper crinkles, beads, bubble wrap, and a product called Plox, which I had ordered last year from Dick Blick, and hadn't done anything with yet. Plox is a finely shredded paper product for collages, the kids loved it. I put all of the supplies on an empty table, gave the students empty cups to carry their supplies in, as well as the paper "buns" and brown construction paper. Then I let them go at it. It was slightly messy, but the kids were very excited, and when some of the students told their teachers what they were doing, I had one teacher show up to make her own!
Now that my supply of "goodies" has been depleted, I will need to start saving for next year, since I am definitely doing this project again. It really pushed the concept of texture home with the students.


Tuesday, December 13, 2011

Art Show snowmen!


The second graders had their music/art show this evening, and since the music teacher was showcasing Christmas music, I decided to have them do some sort of winter picture. I have many snowmen lessons that I do, but decided to research on pinterest for some new ones. I found a great one here: http://mrsjacksonsartroom.blogspot.com/ (you gotta love pinterest!) Anyway... I fell in love with it, and had to have my students make them. So, 92 snowmen later this is what we had for the art show, and let me tell you, the parents LOVED them! Just in case you were wondering why they were not all in a straight row, they were hung on a wall where there was a ramp and handrails, so they had to be staggered in order to not go behind the hand rail. Unfortunately, I am not tall enough to hang them high enough that this wouldn't be a problem. I'm still waiting on my last growth spurt... it just hasn't come yet!
Tuesday, November 8, 2011

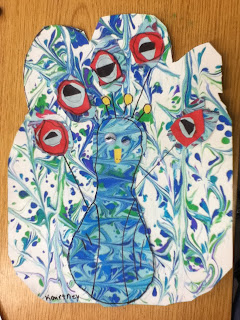
Shaving Cream Peacocks

My school has started an after school enrichment/tutoring program called LEAPS, which stands for Lottery for Education: Afterschool Programs. This program gives the school opportunities to have after school enrichment activities that enhance and reinforce the schools curriculum. Both myself and the other art teacher at my school, Mr. Stephens, have been allowed to have an art club. Between the two of us, there are 2 art clubs offered each day, Monday through Thursday. I have the Monday/Wednesday classes, and he has the Tuesday/Thursday classes. The classes are small for now, and we each have another teacher in the room with us. I have been having a blast with the classes. With only 5-7 kids at a time, you can do so much more and get even messier. The first project that we did is the shaving cream peacocks that are pictured below. I sprayed shaving cream on the tables and let the kids play in it for a few. Then I showed the students how to splatter and drip liquid watercolors onto the paint, and then use the back end of a brush to drag through the shaving cream to marbleize the paint. Then we pressed watercolor paper into the shaving cream, lifted it off and scraped off the shaving cream. We did this twice, making sure to have some areas that were more blue for the body in the second print. The next week, we cut the paper up into peacock shapes, and added construction paper in for added contrast. Everything was outlined with sharpies, and of course we had to glue on wiggle eyes. They really liked making the eyes two different sizes and colors!

I have a lot more projects planned such as origami, toilet paper tube creations, three dimensional stars and more. Right now they are finishing up a bug made from bread and glue. I will post pictures when they are finished.

Wednesday, August 31, 2011

Ms. Malone's art room is going to the birds!


So my second graders have begun working on collages this week. I wanted to make it fun and simple, so I decided to have them create a flock of birds. Only two classes so far have started, once they are all finished I will take a picture of the whole flock, but for now, here are a few of our little chicks...

I gave each student a pre-cut piece of construction paper, and put a pile of pre-cut patterned paper on their table. The student picked out their patterned paper and glued it to the construction paper, and then set the whole thing aside while they worked on their birds. Using more construction paper, they created their birds. If they showed good craftsmanship by not having excess glue, they could choose three feathers to use as the bird's tail. I hot-glued everything together for them, and then we displayed the birds in the hall. They had so much fun with them, and having the feathers as an incentive to finish it neatly was great too!


Monday, October 27, 2008

Where are the Wild Things???? They are in the art room!

The fourth graders in my school are finishing up a collage, based on the book Where the Wild Things Are by Maurice Sendak. I read them the story, and then the students picked out 2 pieces of 12x18 construction paper in the colors of their choice. One of the papers was cut down to 10x16, and the students glue the papers together so that there is a "frame" around the edge. Next, the students got to pick out a piece of animal print paper that is used to create the body. Next, the students used scrap paper to create the head, arms, legs,etc. of their wild thing, and then glued down wiggle eyes. Finally, the students glued down foam shapes in the border. This is a lesson that I found in the Sax catalogue, and have done it for years. The students are always excited to do this lesson.

Tuesday, October 7, 2008

Kindergarten Calico Cats


This is one of my favorite lessons to do with my kindergartners. It is a tissue paper collage with a painted outline. I give each student a 9x12 and a 12x18 piece of paper. Using crayons, I show the students how to draw a body using a large oval, and then add legs and a tail onto it. Then I show them to draw a cat's hear by drawing a circle and adding triangle ears, football shaped eyes, triangle nose and whiskers. Next, the students use black tempera paint to over their crayon lines, and then we let them dry. The next time the students come to art, they are given liquid starch and tissue paper squares. They brush the liquid starch onto the cat, and place the tissue paper onto the starch. Then they brush more starch onto the tissue paper to seal it. I talk to the students about overlapping the tissue paper, and give them time to work. After the cats dry, we cut them out and glue the heads onto the bodies. For a little bit of sparkle, try adding Crayola Glitter It! mixing medium into the starch. The students love this because then their cats are glittery.